Directly view specific phases/entries
Go to Match! Features Overview...
Previous: Display and compare multiple diffraction patterns...
Next: Instant usage of additional information...
This feature is extremely useful in a variety of situations:
- Sometimes you already know that one or more phases are present in
your sample, and would like to quickly select these phases before
getting into the details of determining the remaining phases.
- In other cases you have the suspicion that a certain compound might be present,
and would like to quickly view a corresponding reference pattern
in order to check it.
- Maybe you would like to quickly find and highlight a certain phase, in
order to use it as an internal standard for the correction of
2theta-errors?
- Last but not least this is also a convenient way to quickly display
the data sheet of a certain compound.
Any of these tasks can be accomplished very quickly:
Simply press <Ctrl+F> (or click into the corresponding
new field "Find phases/entries" to the right of the toolbar), then type the name, the formula sum
and/or the entry number of one or more compounds, and finally press <Return>.
Match! will make sure that the corresponding entries are
displayed in the candidate list at the bottom of the screen,
and then automatically highlight the best entry for each criterion (e.g. name or formula sum).
As a result, the corresponding diffraction patterns will be displayed
in the pattern graphics above.
At this point, you are now ready to e.g.
- Visually compare the corresponding pattern(s) to the experimental pattern (and/or
have a look at the corresponding figure-of-merit values that
are calculated automatically).
- Select the corresponding entries as "matching phases" by
pressing the <Space> bar.
- Display the data sheet for a certain single entry by pressing
<Ctrl+D>
- Correct 2theta errors by using the highlighted entry as an
internal standard, simply by pressing <Ctrl+T>
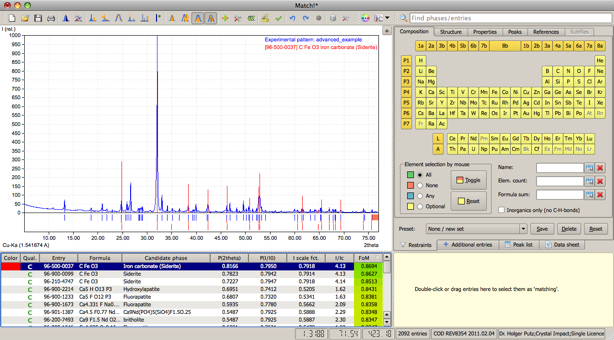
Here is a quick example: Suppose that you have imported your
experimental diffraction data, run the raw data processing, and
performed a first search-match run, in order to calculate
the figure-of-merit (FoM) values of the candidate entries.
Now you are ready to perform your actual phase
identification. Your screen might look like this:
Now, you would like to find and display the diffraction pattern of quartz.
In order to do so, simply press <Ctrl+F> on your keyboard,
type 'quartz', and press <Return>. The best matching
'quartz' entry will automatically be highlighted
in the candidate list and displayed in the diffraction pattern:
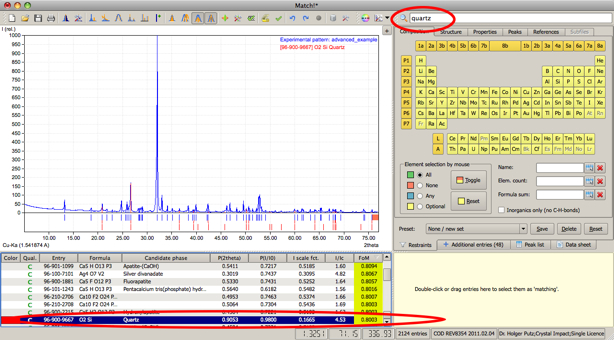
The best matching entry for 'quartz' has already been marked in
the candidate list, so you can instantly use it as an internal
standard for the correction of the 2theta-error. In order to do
so, simply press <Ctrl+T>. The new (corrected) 2theta values
of the experimental peaks will be taken into account automatically in all
'views' of the data, resulting for example in an automatic
update of the candidate list.
Due to the correction, the overlap
between the experimental and the 'quartz' reference pattern has
become better, resulting in an increased figure-of-merit (FoM) value for
this phase/entry. As a result, it will now be displayed more close
to the top of the candidate list:

Now you can easily select the 'quartz' entry as matching: Since it
is still marked in the candidate list, simply press the space bar
to do so. Once the entry has been transfered to the Match list
on the right hand side, the candidate list will instantly be updated,
and the next best matching entry (Siderite in this case) will be
highlighted:

In practice, you could now compare and select the next best
matching entry as well, simply by pressing the space bar again
and so on, until you have identified all phases in the sample.
Go to Match! Features Overview...
Previous: Display and compare multiple diffraction patterns...
Next: Instant usage of additional information...
|


